Advanced Flat Rate: Scaling Your Costs

Moving beyond a simple fixed fee can transform your shipping strategy. When you select the Flat Rate method in your dashboard, you are not limited to a single, static price.

Instead, you can use Advanced Flat Rate formulas to gain full control over your logistics costs. These methods allow you to charge shipping fees that scale automatically with the size or complexity of the customer’s order.

Furthermore, mastering these smart formulas helps you protect your profit margins whilst remaining competitive.

Remember that success fees apply to your product’s retail price. By using these Advanced Flat Rate formulas to charge shipping separately at checkout, you ensure that these delivery fees do not incur a success fee. Consequently, this is often the most cost-effective way to manage your overall platform overhead.

How to Access Advanced Settings

Before you can use a formula, you must be in the correct section of your dashboard. Follow these initial steps to prepare your settings:

  1. In your vendor dashboard, go to settings>shipping.
  2. Navigate to your shipping zone and select your existing Flat Rate method (or add a new one).
  3. Click the method title to open the editing pop-up window.
  4. Locate the field labeled Cost. This is where you will replace the simple fixed number with one of the smart formulas below.

Smart Shipping Formulas

You can change the numbers in the below formulas to make them work for you.

1. The Per-Item Fee

This formula charges a base rate plus an additional fee for every item added to the cart.

  • Formula: 10 + (2 * [qty])
  • Why use it: This is perfect for shops that sell a mix of small and large items. It covers the base courier cost and scales to account for the extra space or weight of additional products.
  • Checkout Example: If a customer orders one item, they are charged $12 ($10 base + $2 for the item). If they order three items, they are charged $16 ($10 base + $6 for the three items).

2. Percentage-Based Shipping

This formula calculates shipping as a percentage of the total order value.

  • Formula: [cost] * 0.1
  • Why use it: This is ideal for vendors selling high-value items where courier insurance costs increase based on the value of the goods being shipped.
  • Checkout Example: If a customer places an order worth $100, the shipping fee is $10 (10% of $100). If they place a larger order worth $500, the shipping fee automatically increases to $50.

3. Percentage with Min/Max Caps

This formula applies a percentage but sets strict boundaries on what the customer pays.

  • Formula: [fee percent="10" min_fee="5" max_fee="20"]
  • Why use it: Use this to prevent shipping fees from becoming unreasonably high for large orders or too low for small ones. It provides a safety net for both you and your customer.
  • Checkout Example: For a small $30 order, the fee is $5 because it hits your set minimum. For a large $400 order, the fee is capped at $20, even though 10% would have been $40.

Final Implementation Steps

Once you have entered your chosen formula into the Cost field:

  1. Click Save at the bottom of the pop-up window to apply your changes.
  2. Ensure you test a variety of cart sizes to confirm the math works for your specific items.
  3. Use a different browser OR log out to verify the shipping cost at checkout and ensure it appears as expected.

We suggest using these formulas to ensure your delivery income matches your actual courier costs. By charging fairly based on the items in the basket, you avoid the common mistake of under-charging on larger, multi-item orders.

Now that you understand the basic formulas, it is time to apply them to your specific product range. Because different items require different handling, you can use Shipping Classes to target your costs more precisely.

By combining the logic of your main flat rate settings with these specific size classes, you can automate your shipping prices based on the physical requirements of every order. Use the guide below to understand how to configure these fields and choose the calculation method that best protects your bottom line.

Mastering Shipping Classes

This guide helps you set up shipping fees based on parcel size. Use these tools to ensure your charges are accurate and fair.

The Golden Rule: Your Safety Net

Always enter a base rate in the main Cost field (e.g., 5.00). If you ever forget to assign a shipping class to a new product, this ensures the customer is still charged for shipping instead of receiving free delivery.

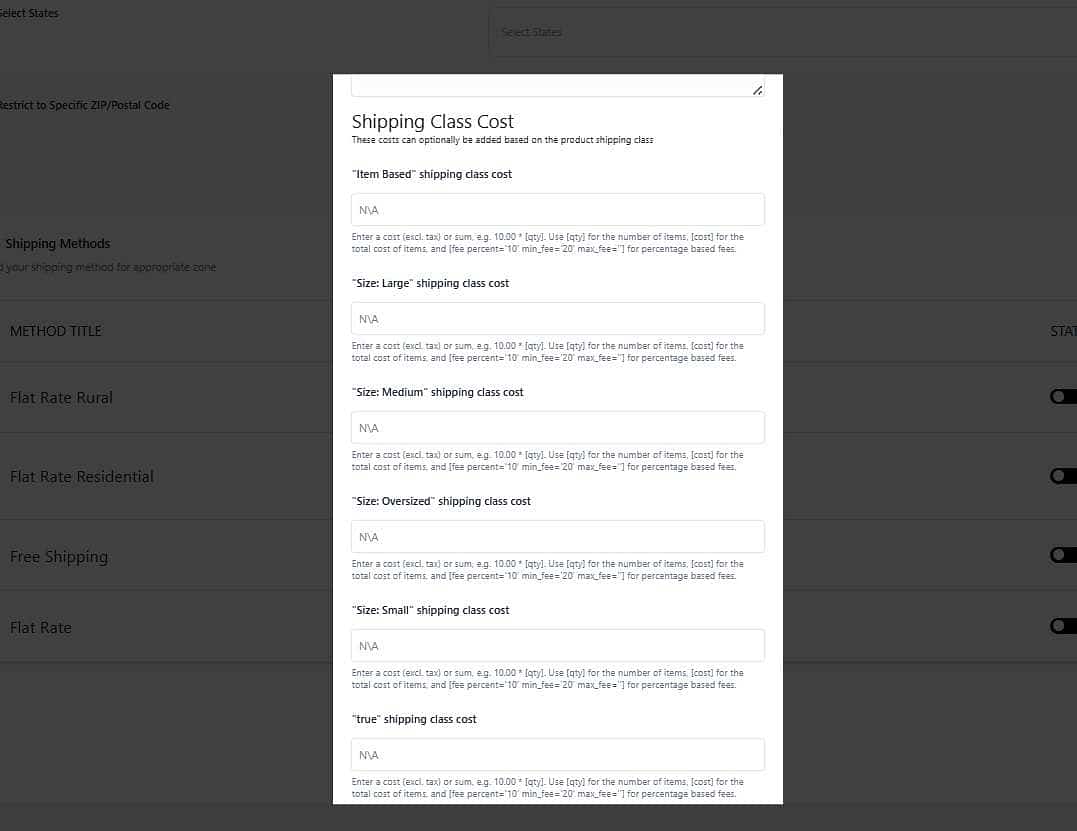
1. Regular Size Classes (Small, Medium, Large, Oversized)

Use these to account for the physical footprint of your items.

  • Size: Small
    • Strategy: Flat rate per item.
    • Formula: 2.00 * [qty]
    • Example: If a customer buys three small items, they pay $6.00 shipping.
  • Size: Medium
    • Strategy: Base fee plus item fee.
    • Formula: 8.00 + (3.00 * [qty])
    • Example: $8.00 base + $3.00 per item. A 2-item order costs $14.00.
  • Size: Large
    • Strategy: Percentage of order value.
    • Formula: [fee percent='10' min_fee='15']
    • Example: 10% of order value, with a $15.00 minimum charge.
  • Size: Oversized
    • Strategy: Premium fixed rate.
    • Formula: 30.00
    • Example: A high flat fee to cover specialized courier handling.

2. Advanced Classes

  • “Item Based”: Best for items that are tricky to ship but don’t fit into size categories.
    • Formula: 5.00 * [qty]
  • “Weight Based”: Use this if your courier charges strictly by weight.
    • Formula: 1.50 * [qty]
  • “true”: This is a system default tag. Keep your base rate here for consistency.
  • No Shipping Class Cost: This applies to products that have no class assigned. Use your baseline fee here (e.g., 5.00).

3. Calculation Types: How Fees Add Up

At the bottom of your settings, choose how the system handles multiple classes:

  • Per Class: The system adds the costs of all classes together.
    • Best for: When you want to charge for every item or size separately.
    • Example: 1 Small item ($2) + 1 Large item ($15) = $17.00 total.
  • Per Order: The system identifies the most expensive shipping class and charges only that.
    • Best for: Protecting your margins on mixed-size orders.
    • Example: 1 Small item + 1 Oversized item ($30). The system ignores the Small item and charges $30.00 total.

DON’T FORGET: for these shipping class fees to apply at checkout, you have to assign each of your products to a shipping class. if they are not assigned to a class, then only your default charge will apply or no shipping will be charged at all, depending on your settings.

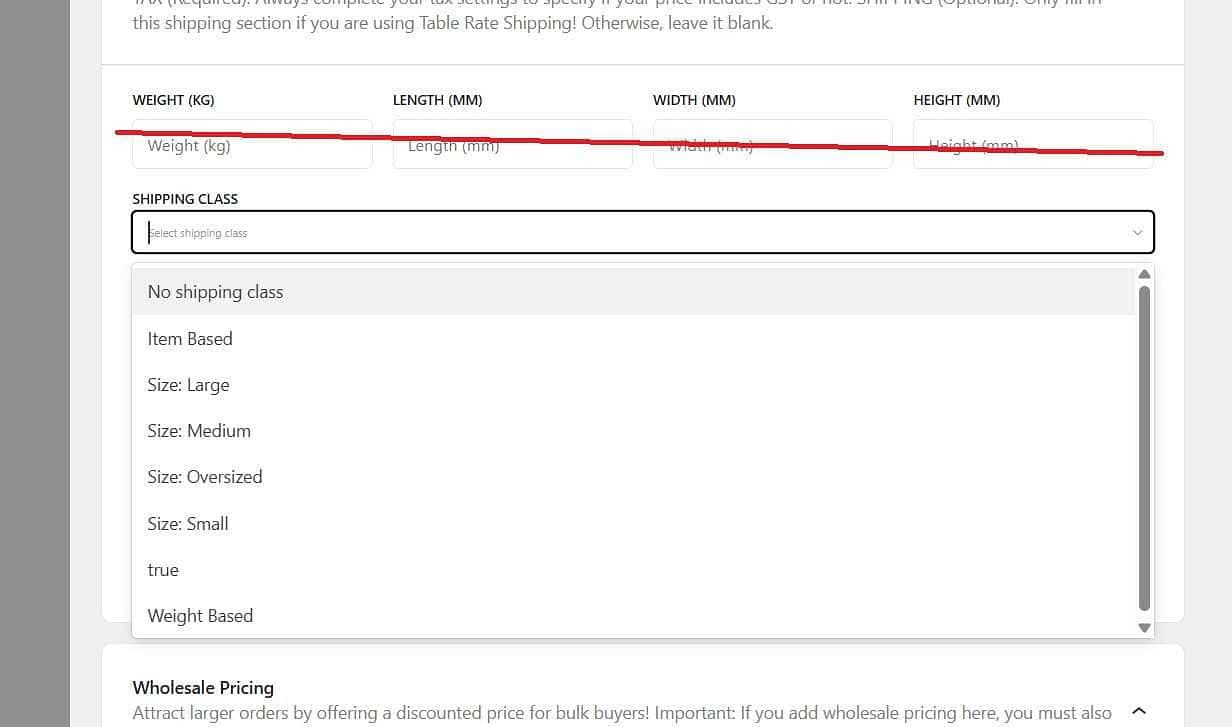
Assign a shipping class to a product:

  1. go to your vendor dashboard and open a listing/create a new listing
  2. scroll down to the ‘shipping class’ section
  3. pick the shipping class the item needs to be to charge the correct shipping.
  4. See image below

Quick Tips for Success

  1. Keep it clean: If you don’t use a specific class, set it to 0.00 or leave it blank.
  2. Test your work: Always perform a “dummy” checkout (without ordering) at checkout to see the final price.
  3. Stay consistent: Use similar formula styles across different size classes to avoid confusing your customers.

Flat Rate Shipping Guide

Many vendors choose Flat Rate Shipping because it is simple and predictable for both the seller and the buyer. Essentially, this method allows you to set a fixed price for delivery, regardless of the value or weight of the items in the customer’s cart. Because it is easy to understand, this strategy often leads to fewer cart abandonments.

First, you must decide on a consistent rate that covers your average postage costs. Furthermore, you should ensure this rate remains competitive compared to other sellers in your niche. If you are just starting out, Flat Rate Shipping is the most straightforward way to begin selling on The Hive NZ.

Although this method is perfect for basic orders, you might eventually need more flexibility. Therefore, we have provided a more in-depth guide on advanced options in the next article. In that guide, you will learn how to adjust your rates based on specific product requirements.

Basic Flat Rate Setup

Follow these steps to configure your delivery options. Flat Rate Shipping allows you to provide predictable costs for your customers.

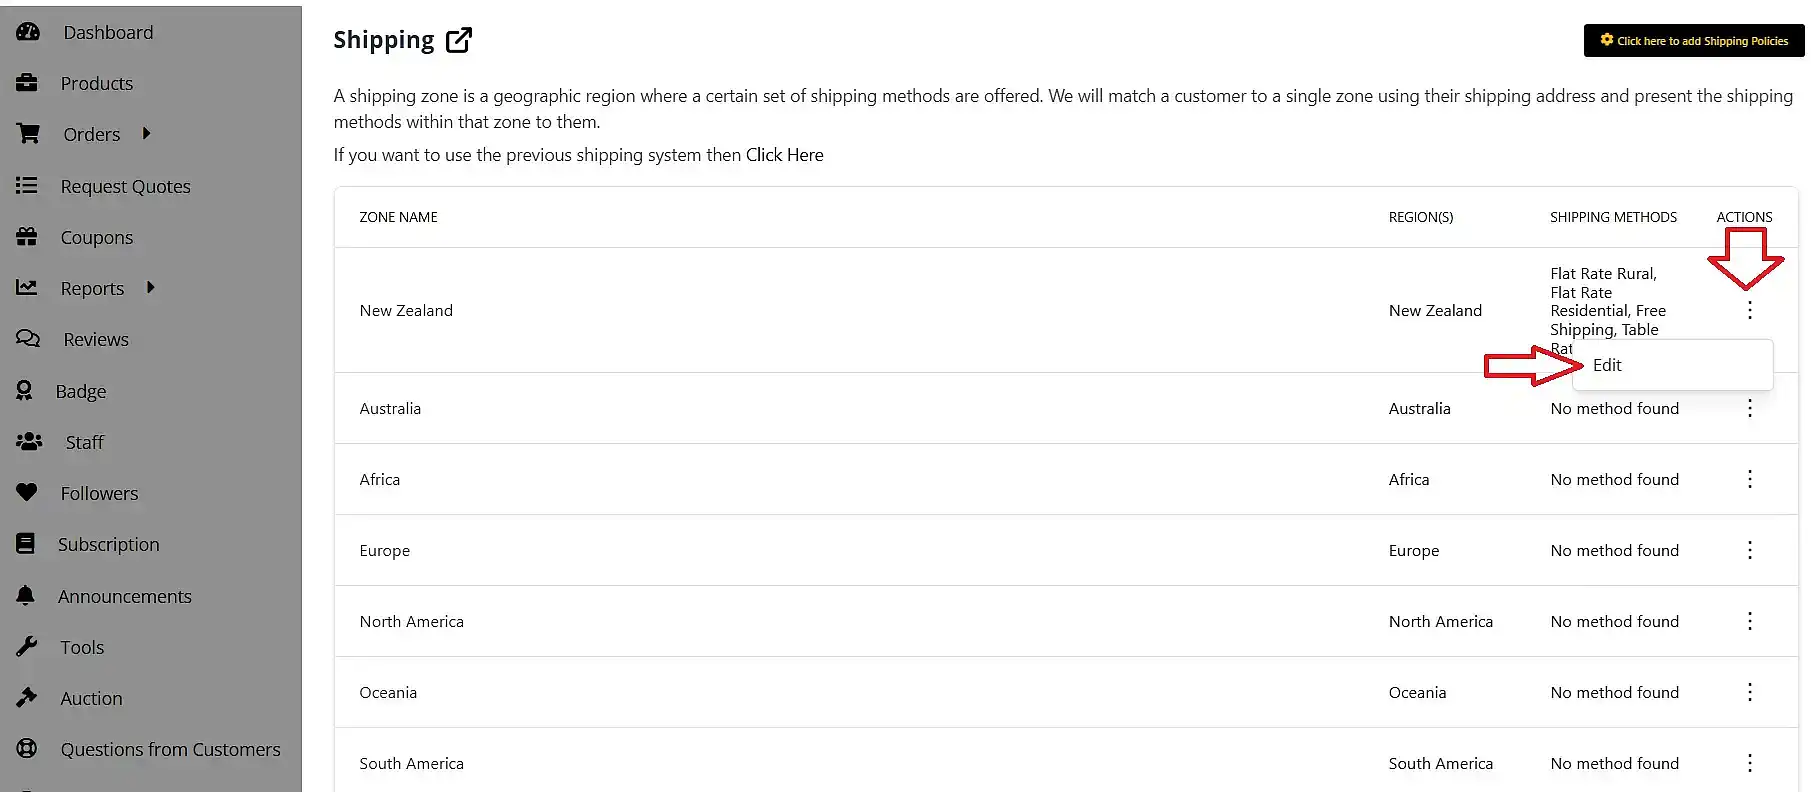
Step 1: Click the three dots beside the zone you wish to edit. Please note that if you do not edit a zone, customers from that region will be unable to order from you. Once you click the dots, a new screen will open.

click to edit the region you want to add shipping for

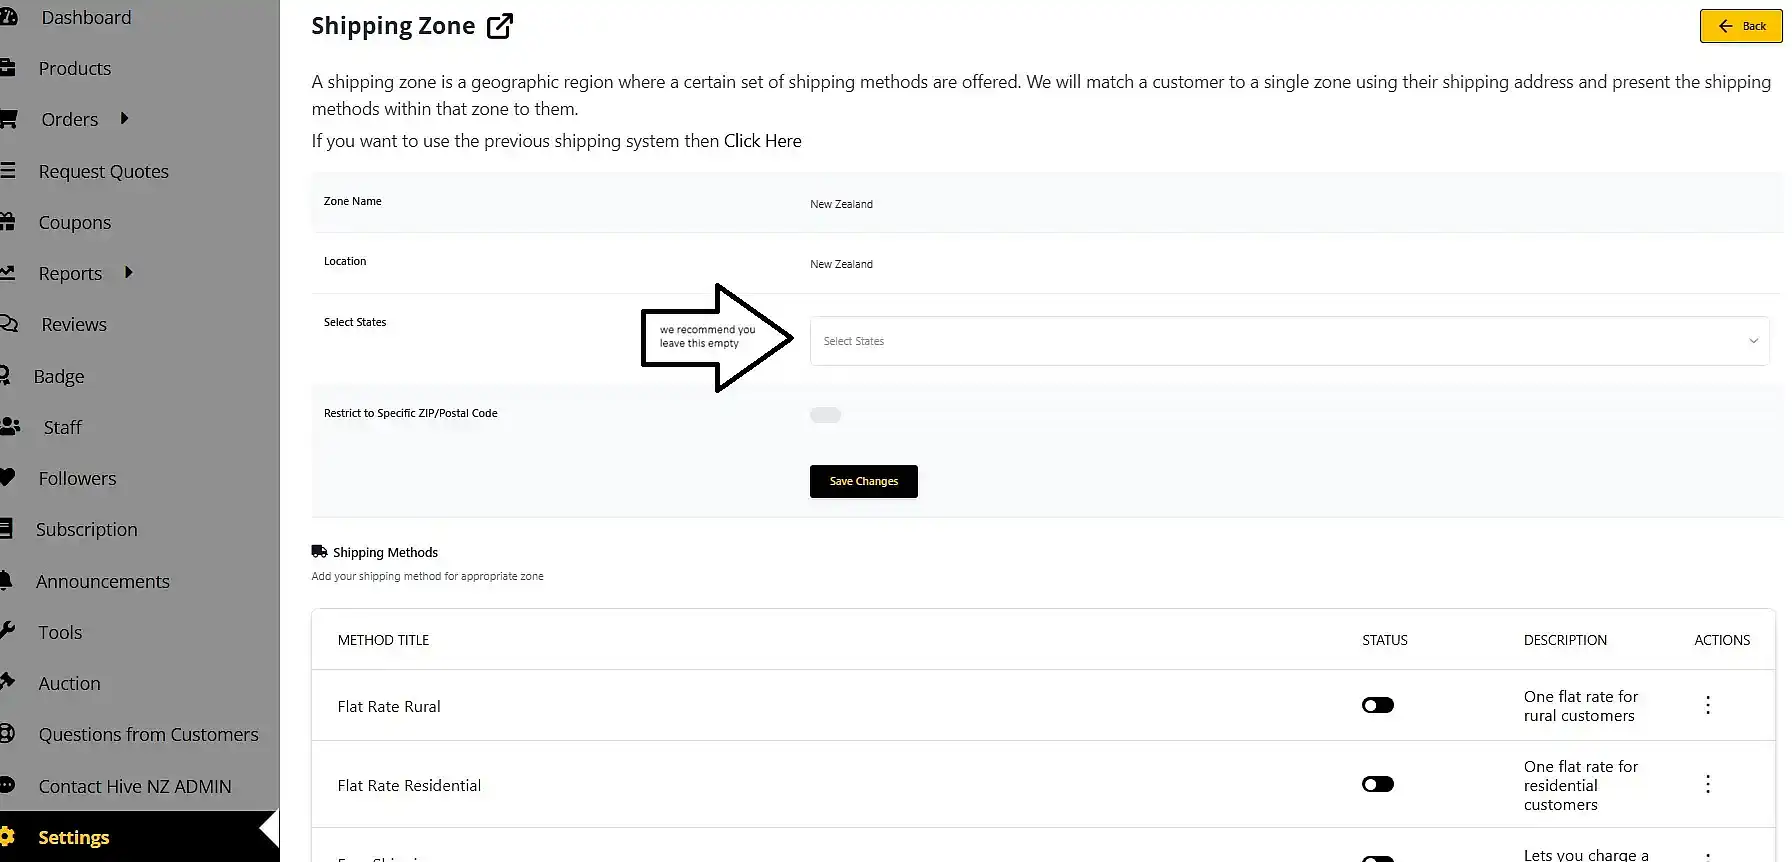
We recommend leaving the ‘select states’ field empty; consequently, your shipping method will apply to the entire region.

shipping zones leave empty to ship to the whole of new zealand

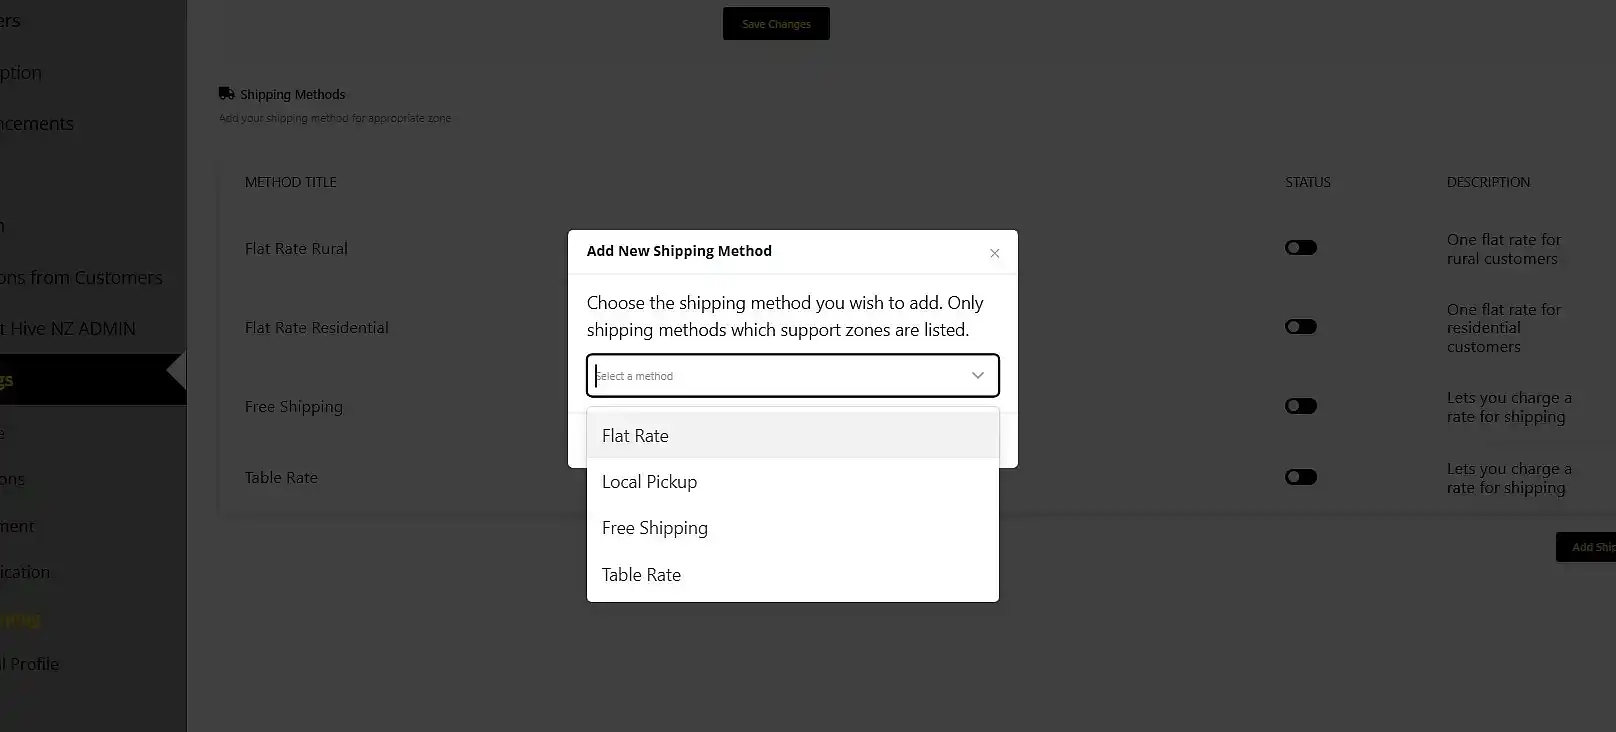
Step 2: Click ‘add shipping method’ to see a pop-up window.

click add shipping method and see pop up

To implement a Flat Rate Shipping method, select ‘Flat Rate’ from the drop-down menu and click ‘add method’.

Note: You can repeat this process if you want different rates, such as one for rural and one for residential customers.

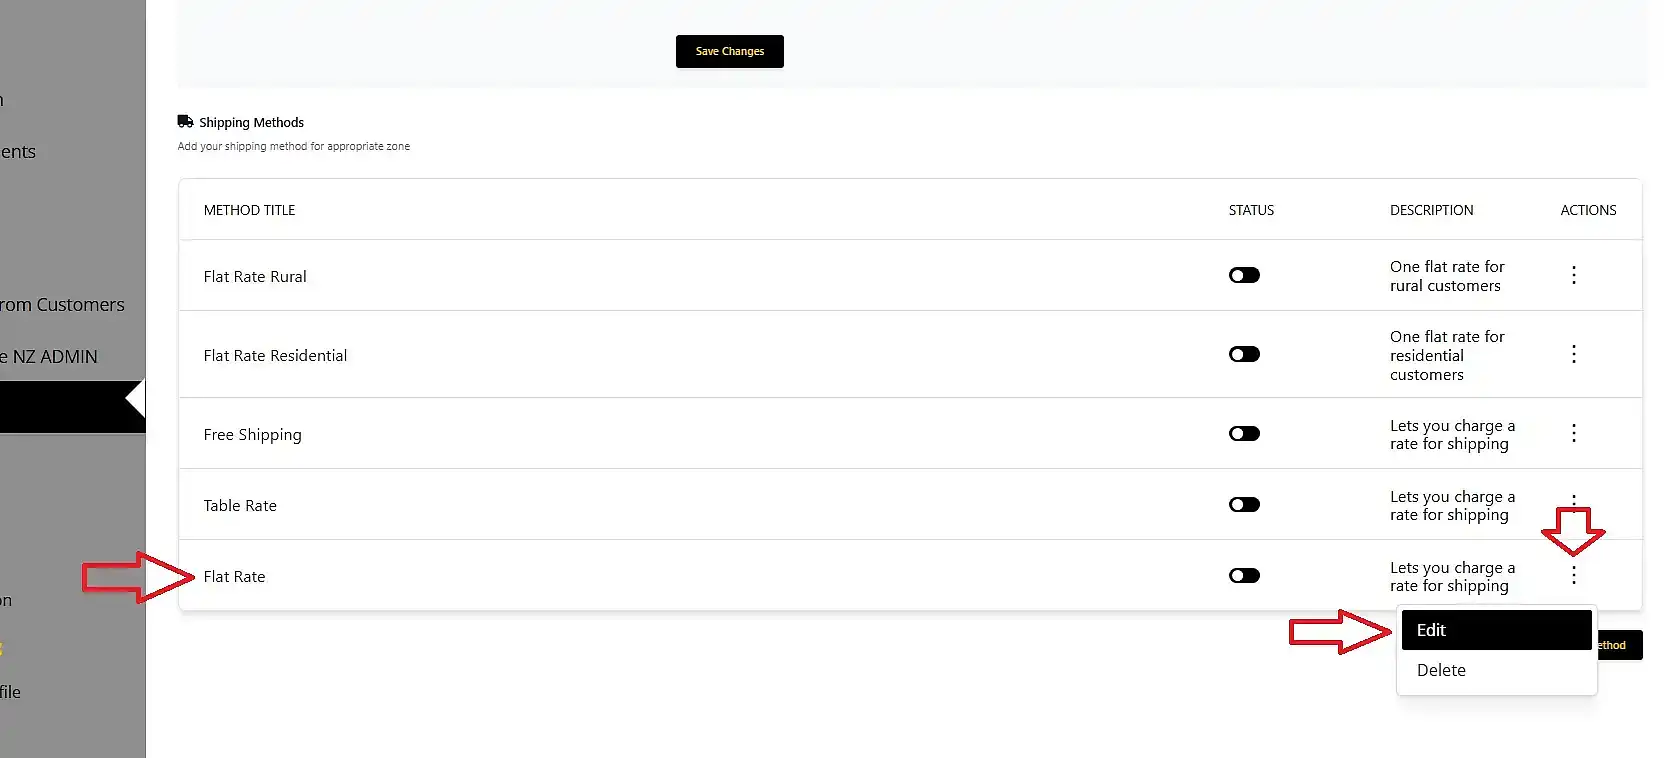
Step 3: You can now edit your shipping option.

where to click when you want to edit a shipping method

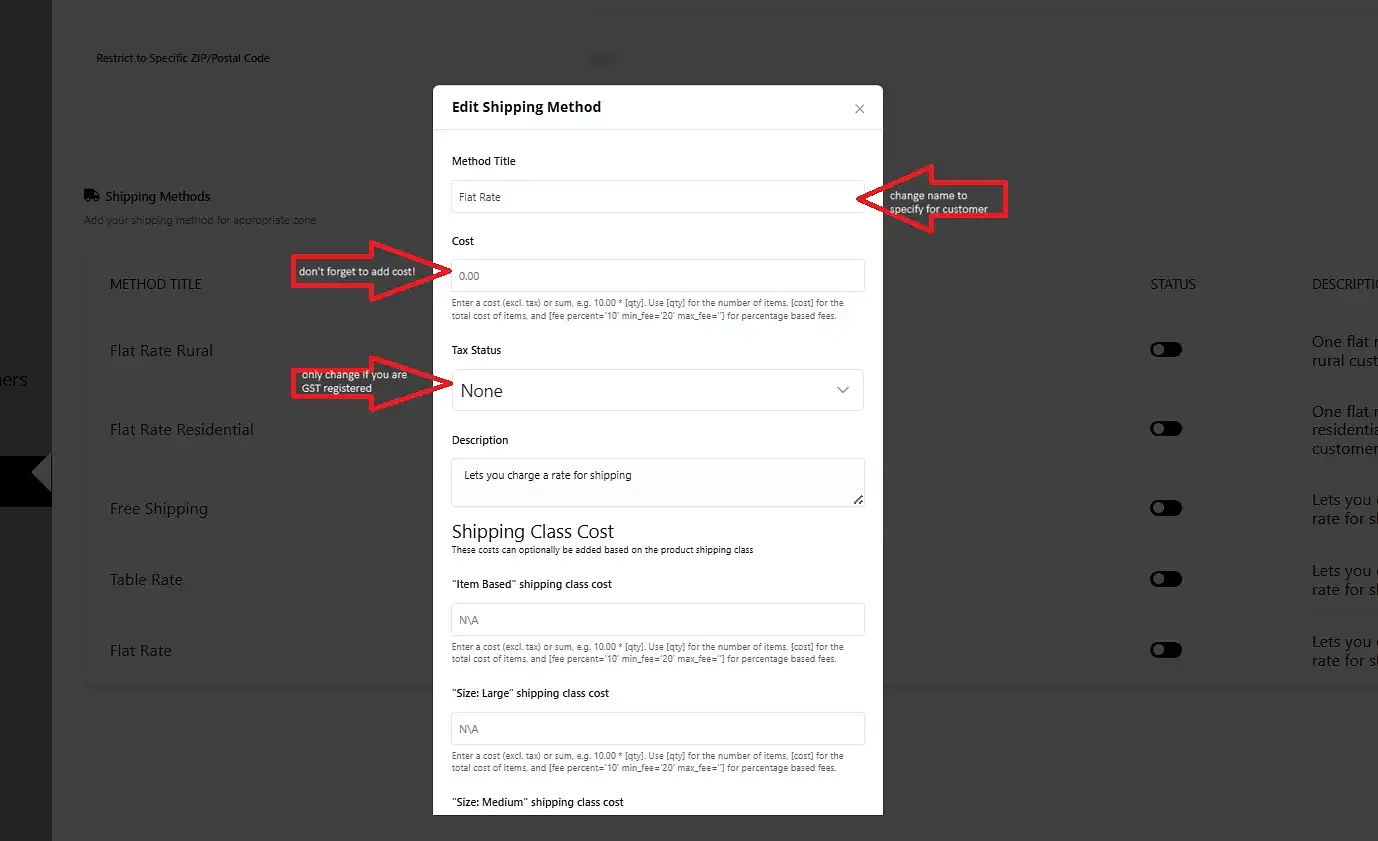
Firstly, set the name under the Method Title field; you can use descriptive names like ‘Rural NZ Wide’ or ‘Flat Rate NZ Wide, this will let the customer know what they are choosing.

Secondly, set the price for that specific option.

You do not need to change any other settings unless you are GST registered. In that case, ensure you update the tax status accordingly.

Finally, scroll down and click ‘save method’.

flat rate shipping what to fill in

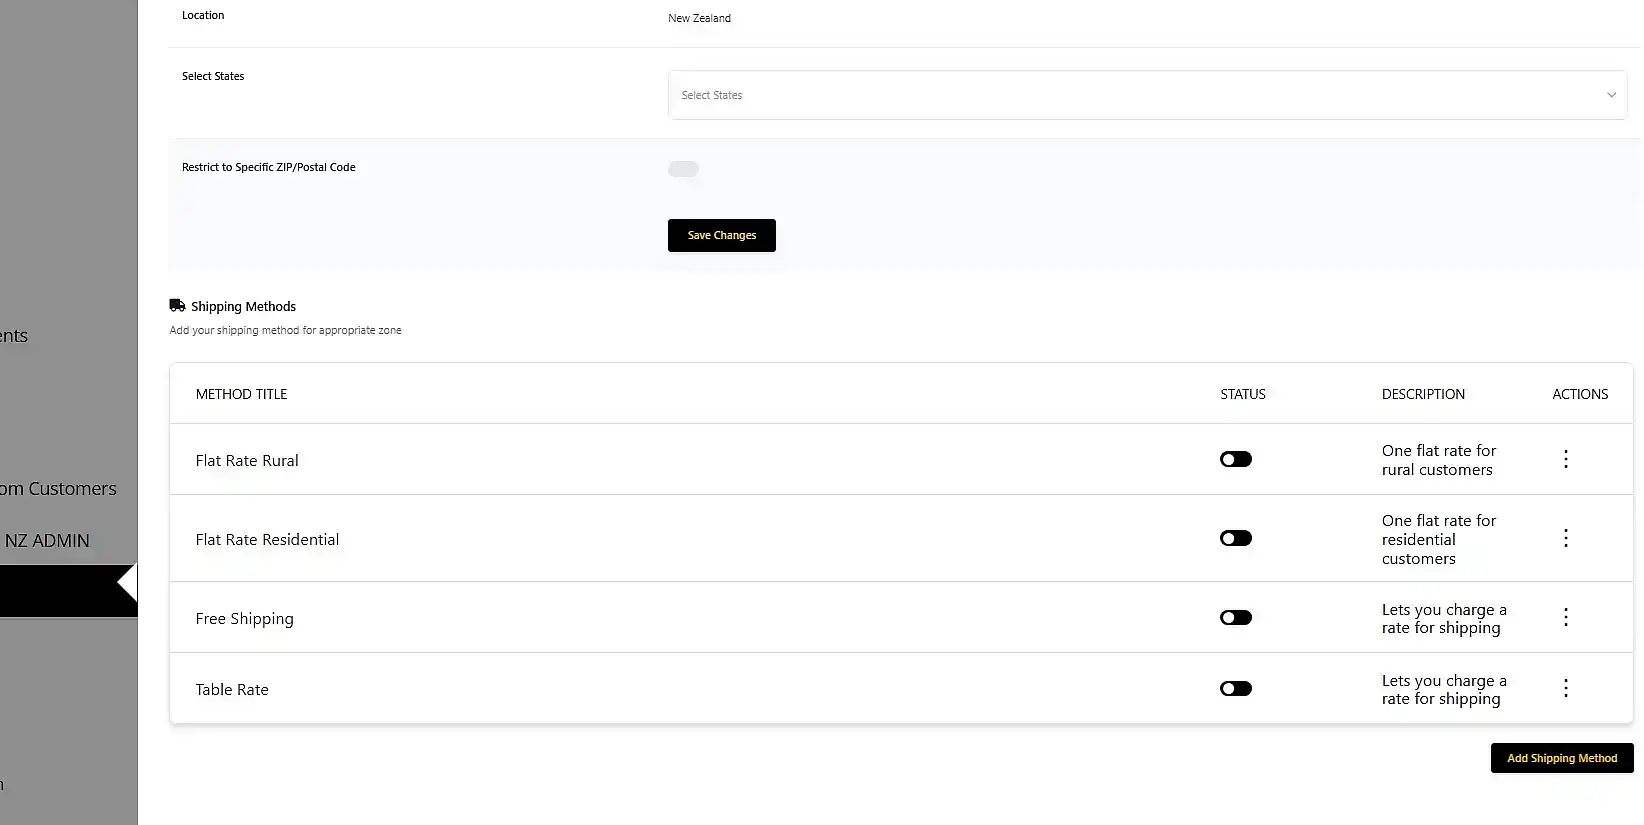
Step 4: Your new Flat Rate Shipping method will now appear in your list.

all the set up shipping methods in a list

You may leave it as it is, or you can add more methods to the list to suit your business needs.

Important Considerations for Your International Zones

You are also able to set up shipping methods for international zones.

However, if you choose not to set these up, customers from those countries will be unable to shop from you.

We do not advise setting up shipping based on individual postcodes or specific states. It has proven difficult to keep this information accurate and up-to-date on a worldwide scale.

Configuring Your Shipping Information Tab

Use this guide to set up the Shipping Tab on your product listings. Although you define your actual shipping rates in your main settings, this tab allows you to communicate your specific delivery, processing, and refund policies to the customer. Providing clear information on every listing creates transparency; furthermore, it builds trust before the customer reaches the checkout.

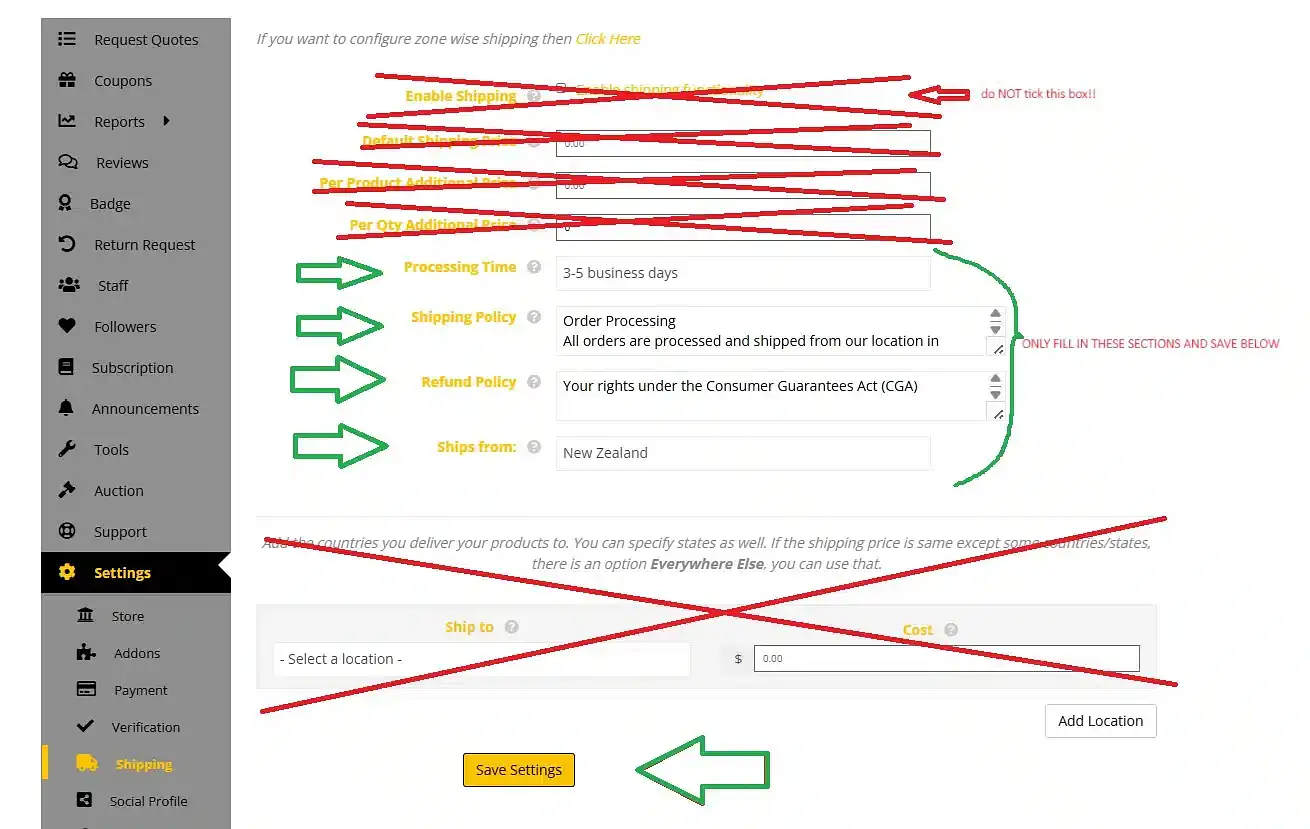
Please read these instructions carefully. You must keep the specific tick box mentioned in Step 3 unticked. Selecting this box by mistake triggers an outdated system. Consequently, this may prevent customers from completing their orders.

Setting Up Your Shipping Tab

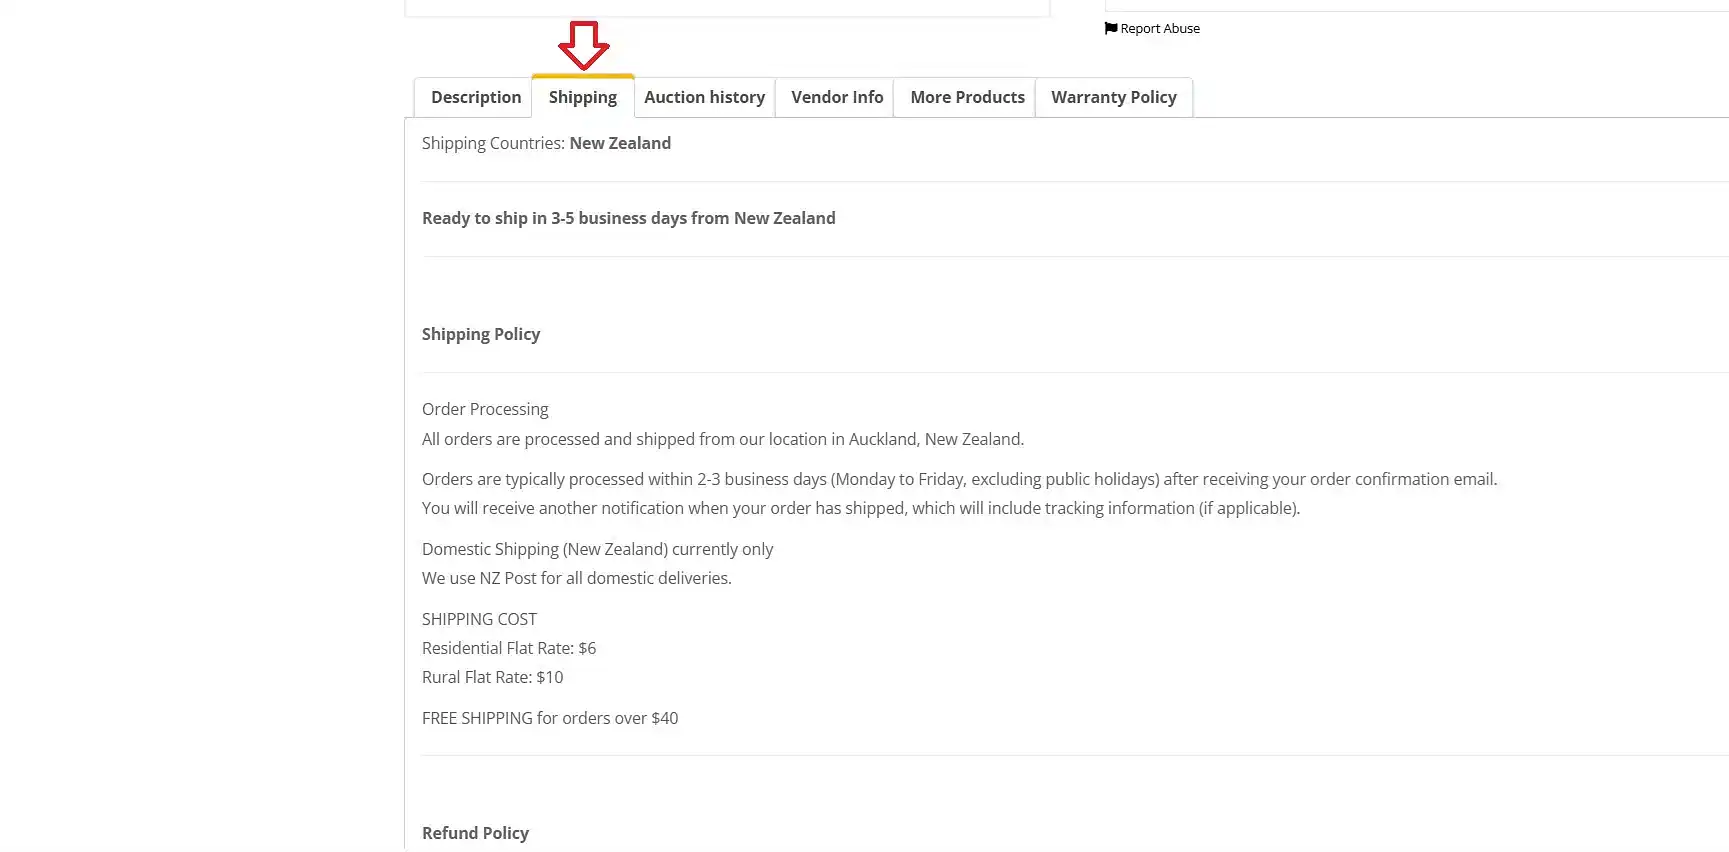
Each product listing features a dedicated shipping tab. Configure this section to help customers find key information directly on the product page:

  • Where you ship your items
  • How quickly you dispatch your orders
  • Your shipping policy, including standard costs
  • Your returns and refund policy

When you edit these settings, the system automatically applies the information to all your products as shown here:

Below the steps to configure the shipping tab on all your product listings:

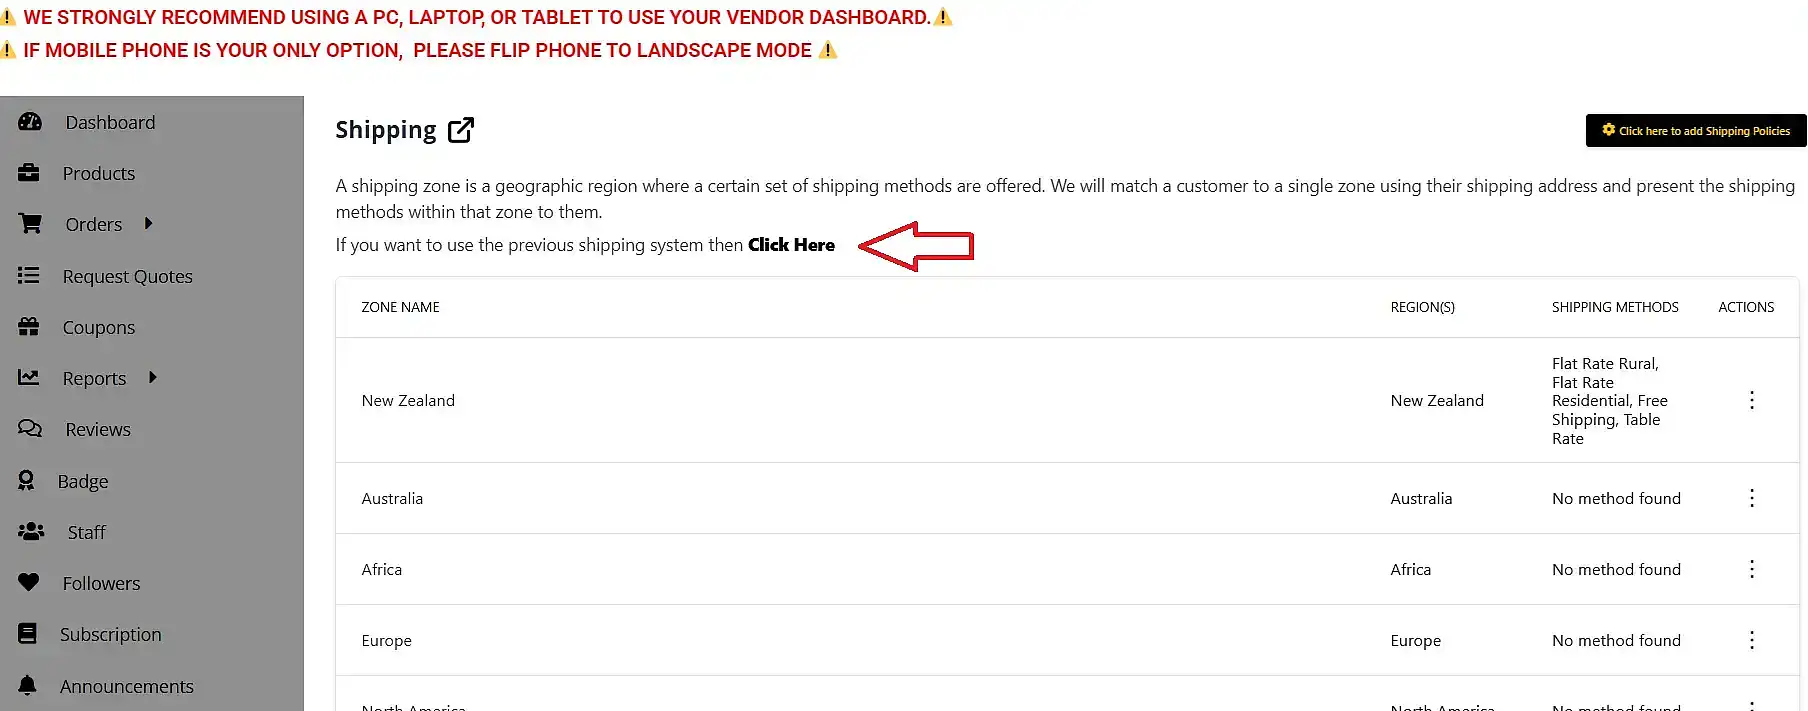
STEP 1: Navigate to your Vendor Dashboard>Settings and select the Shipping tab.

STEP 2: At the top of the screen, you will see the prompt: “If you want to use the previous shipping system then Click Here.”

STEP 3: Use the fields indicated by the green arrows in the screenshot below to input your policies. This is now your opportunity to inform the customer of your shipping charges as well. Add what options – and their cost – you have available as shown in the first screenshot of this guide.

Vital Check: For the current shipping system to function correctly, the tick box at the top must NOT be ticked. If you check this box, you will revert to an outdated system which can cause issues with customer orders.